Introduction
This guide will show how to do the basic fitting on Colt Python grips, but the same principles apply to any Colt V-spring revolver.
It may seem like a long read, but keep in mind that you cannot solve a problem without knowing what the problem actually is. Trying to fit grips by randomly cutting and filing will usually result in a huge mess, so this guide will hopefully help you to identify the fit issues, and to deal with them in a proper manner without guesswork and without ruining your grips. The guide can be used for any type of grips (reproductions as well as original) that mount in a similar fashion as on the Colt V-spring revolver, so it applies to many other brands and types of revolvers as well.
Before you go on, it’s important to know that revolvers are not as precisely made as one may think. Many Colt models have been made for decades, so tooling, production machinery and fixtures have been changed, repaired and replaced several times through the years. Many of the surfaces where hand blended during the manufacturing process, which also added irregularities to the shape. All this has lead to small dimensional variations in the frames, which in turn can affect the fit of the grips. This goes for other brands as well.
One of the most common flaws of revolver frames is that they are not perfectly symmetrical from side to side. The curve of the back strap will often vary a little bit, and it also happens that frames are a tad too thick or thin. In other words: There’s not necessarily something wrong with grips that don’t fit, we have actually found that fit issues are very often (or maybe most often) caused by variations in the gun frames. This means that problems can occur with original grips as well as reproductions, and this is basically just par for the course.
In short: Whatever other grip manufacturers want you to believe, there is no such thing as revolver grips that will fit every gun ever made. We may lose a few sales by telling you this, but it’s simply the nature of revolver frames.
How to install the grips
Before we go on, lets cover the simple task of putting the panels on the frame. It’s always easier to put the top of the panel into the frame first, then press it onto the bottom pin. Doing it the other way around can make it near impossible to install tight fitting grips.
Also make sure the panels are pressed on all the way before you install the screw. Properly fitted panels should go on with some light resistance, and if you can’t seat the panels by hand: DO NOT try to use the screw to force them on! Chances are that you will strip the screw, the nut or both. The screw should only be snug, and there’s absolutely no need to tighten it more than that.
It’s a common misconception that the screw is crucial to the fit, but it’s not. It’s only there to keep the panels together, and perfectly fitted grips should actually stay on the frame even without the screw installed. When you’re fitting grips, set the screw aside and don’t even try to install it until the panels fit snugly on the frame and are nicely aligned.
How the panels are held to the frame
To understand how grip fitting works, you must first understand how the grips are held to the frame. If you look at the back of a grip panel, you’ll find a pin hole at the bottom and a half moon shaped cut at the top (marked in red in the picture below). This top area is what we refer to as the “half moon” in this guide. These two areas alone determine the fit and angle of the panels.
You will get a good picture of the principles of grip fitting if you imagine the panels being held in place by the lower pin only. They will be held firmly right at the pin, and since the pin goes through the frame it will also align the panels with each other at that point. However, the panels will be free to pivot around the pin, so they also need support at the top. This support is provided by the half moon, and the location of the half moon will determine A: The angle of the panel and B: How tightly the panel fits on the frame.

Some important basics of grip fitting
First of all: The lower pin hole is the “absolute reference point” and should never be messed with, period! If you try to enlarge it, move it or change it in any other way, you will only make matters worse.
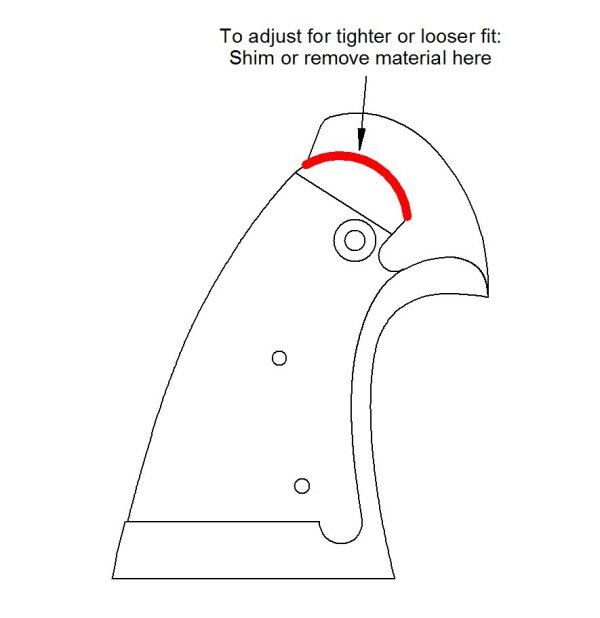
Any adjustments should be made at the top half moon. If it’s moved up or down, the fit will become tighter or looser. If you move it toward the front or the rear of the gun, the panel will be pivoted around the pin at the bottom, which changes the angle. These adjustments are made by either shimming or removing material from the half moon.
To remove material, you can use a small file, a piece of sandpaper on a block, or you can swipe one of your wife’s nail polishing sticks in the bathroom. Any tool that can remove the material in a controlled manner will work.
The easiest way to shim is to cut strips of masking tape and stick them to either the frame or the grip panel. We like to super glue paper shims to the frame. Paper soaked in hardened super glue makes for a firmer fit than softer materials like masking tape. The super glue is easily removed with acetone if need be, and it won’t hurt finishes like bluing, nickel or stainless. You can glue the shims to the grip panel as well, but they will be a bugger to remove if you ever have to do that. But again: Masking tape is very easy to use, and it will do the job.
The adjustments should be made in small increments. You adjust a bit, test fit, adjust some more, and you continue doing this until the panel fits properly. The adjustments needed for a perfect fit are usually surprisingly small, so easy does it.
Issue 1: The fit is too loose or too tight
Sometimes the panel will be so tight that it won’t fit on the frame at all, and if that happens: Do not force it! There should be some resistance, but not to the point where you have to press hard on the panel. If you force it you will more than likely bugger the pin hole, and this is why the holes are often enlarged or oval on used grips. Instead, file down the half moon a bit, a little at a time while test fitting frequently, until the panel goes on and fits snugly. When it goes on with slight resistance and stays on the frame by itself, it’s perfect.
It is also quite common that the grips are loose, which will make them rock back and forth. If that’s the case: Do not overtighten the grip screw to hold the panels in place! Tightening the screw will sure appear to help, but all it really does is to increase the friction between the panels and the frame. With enough force (like recoil), the panels will simply overcome the friction and start sliding back and forth again.
If you overtighten the screw, it will compress the wood and take a set. You see this in many old grips: The screw has been tightened and retightened over and over again, the wood has been more and more compressed, and the screw will finally sit so deep that there’s not enough thread to tighten it anymore. Also keep in mind that the screw has a tiny #2-64 thread, and it’s easily stripped if you tighten it too much. In short: You can do a lot of damage to the grips if you overtighten the screw, so don’t do it!
The correct remedy for a loose fit is to shim the entire half moon until the panels are snug. Once they fit well on the frame, you may find that the panels don’t align with each other. If that’s the case, go to “Issue 2” below.

Issue 2: The panels don’t line up with each other
This issue is usually due to a slightly misaligned frame, where the half moon cuts are not perfectly aligned side to side. To adjust this, you need to pivot one of the panels around the bottom pin.
The first step is to have a good look at both panels to determine which one you need to adjust. You will very often find that it’s the left panel, and the reason for this is the side plate. It is machined as a separate part and then fitted to the frame, and it’s not always perfectly aligned from the factory.
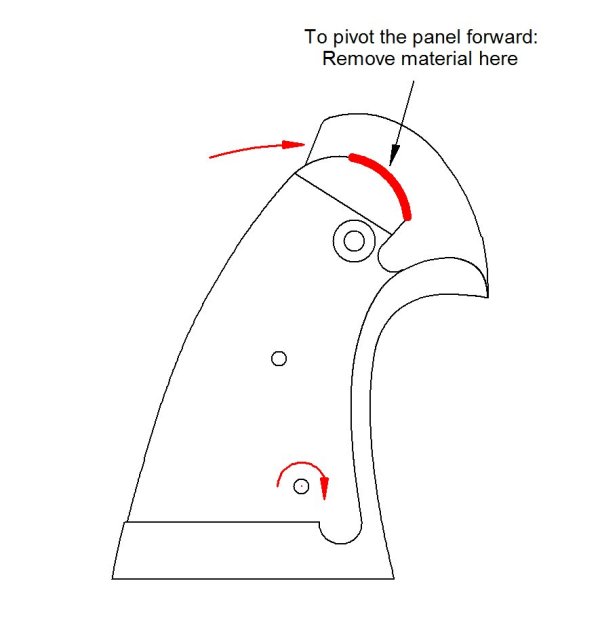
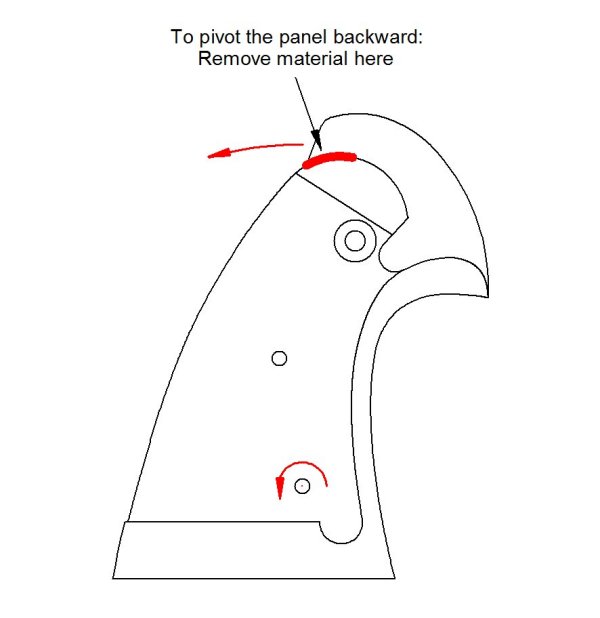
The adjustment is made at the top: You remove material from the front part of the half moon to pivot the panel forward, and from the rear part to pivot it to the rear. After adjusting the alignment you will normally have to shim the panel to get a firm fit, and this can be done as described earlier. The pictures show the areas you need to address in order to pivot the panels. If shimming is needed after the adjustment, it’s done according to the same principle: Shim the back of the half moon if you have moved it forward, and vice versa.
In some cases (mostly on guns made in the ‘70s and ‘80s) both frame cuts will be located too far forward, and this will pivot both panels forward. The result is that the sides of the grip frame will show behind the rear edge of the grip panels, and this is adjusted by pivoting both panels to the rear, removing material and shimming as per above.


Issue 3: Random gaps between the panels
Sometimes you’ll see small gaps in a few places between the panels. With old original grips, it can often be caused by warpage in the wood. On warped grips, you will most often see a gap at the “nose” of the grips, right behind the trigger guard. The gaps can also be caused by the frame being a bit too thin, and the tell-tale sign is that a gap opens up at the bottom of the front grip strap when you tighten the screw.
The first thing to check is the bottom pin. It has a shoulder on each side, and these shoulders need to be flush with the sides of the frame. If one of the shoulders protrudes above the surface of the frame (ie: the pin is not seated correctly left-to-right), the grip panel will stop against the shoulder and won’t sit tight against the frame. The solution to this is to either tap the pin into its correct location with a brass hammer, or to make a shallow relief cut around the pin hole in the panel. It can be a bit scary to use a hammer on an expensive gun, so relieving the hole is the safest way to do it. You can do this by hand with a sharp drill bit or a knife.
If the pin is correctly installed, you have to adjust the width of the grips by sanding the mating surfaces. Place a sheet of sandpaper on a perfectly flat surface, and carefully sand the mating surfaces until you have a good fit. We use 120 or 180 grit for this, depending on how much material we need to remove. When doing this, keep in mind that it’s easy to remove material, but it’s impossible to put it back again! Sand a little bit at a time on each panel, while test fitting frequently. You also need to hold the panels perfectly square with the sandpaper to make sure the surfaces end up flat.
This method can also be used on warped original panels, although there’s often not enough material to sand off to get a perfect fit.
Issue 4: An even gap around the whole perimeter of the
panels
If you see an even gap all the way around the perimeter, your frame may be a tad too thick. If using old, original grips, it could also be caused by shrinkage in the wood.
Fixing this is a bit more challenging, since it will require removing an even amount of wood from the inside of the panels. The best tool for this is a professional gun stock scraper, available from sources like Brownells and Midway USA. A small, generic scraper like the “Red Devil” brand from the hardware store will also work, but it needs to be honed to a straight and sharp edge. A good, sharp scraper will shave off the wood neatly, but it takes some skills and patience. But of course, you only scrape the back of the panels, so boo-boos won’t be visible unless you take the grips off again. Just as in any of the fitting methods above, you need to take a little at a time and test fit frequently.